

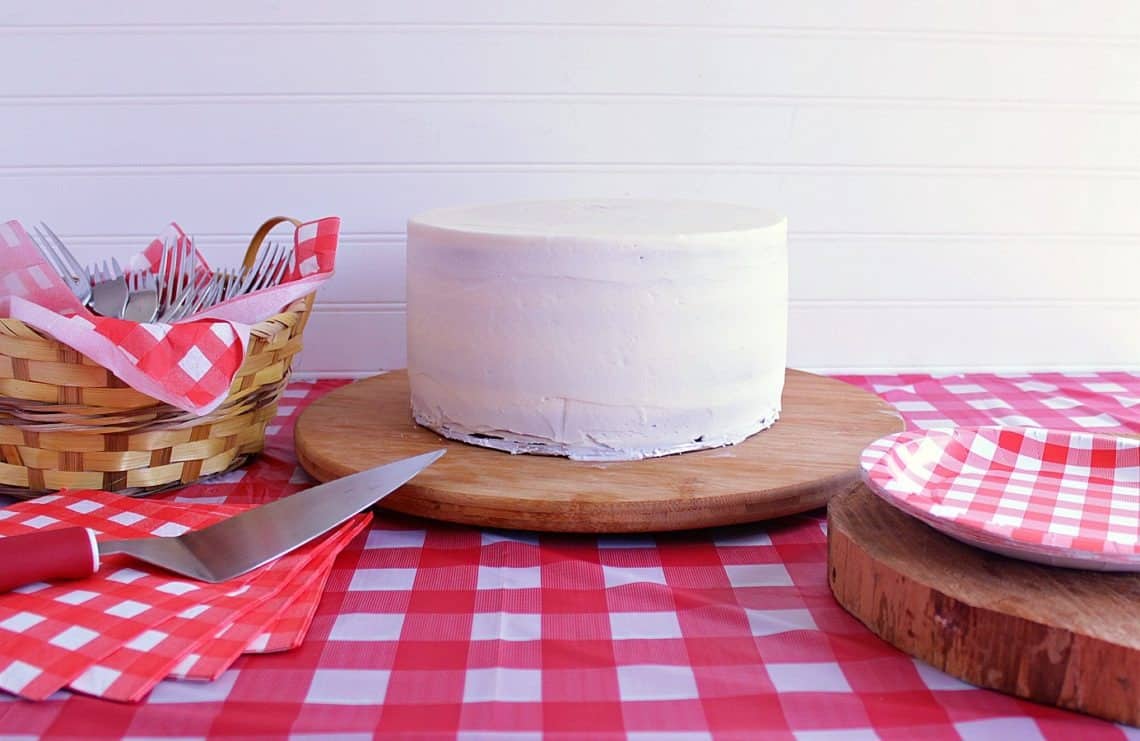
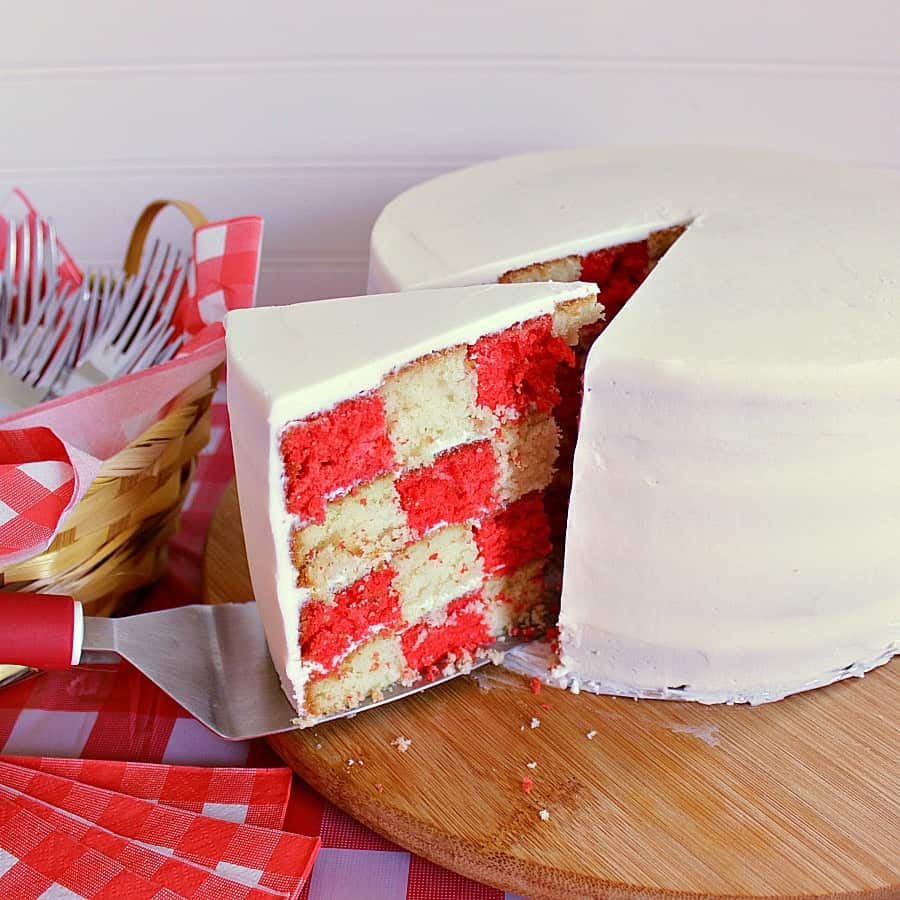
Wow your friends at your next picnic with this Super Cool Picnic Party Plaid Cake! Don’t worry, it’s surprisingly easy to create!

How cool is this plaid cake? It’s Super Cool!
This year for my oldest daughter’s birthday we decided to do a picnic themed birthday party. The plan was to do a huge picnic at the park with hot dogs, pasta salad, baskets of chips and of course this gorgeous plaid cake! Unfortunately the weather was awful so we had to bring the picnic indoors, but at least we still had this Super Cool Picnic Party Cake!
Ever since I saw that lumberjack cake that went viral I have been itching to try to build my own plaid cake. It’s such a cool concept, one that is hard to imagine how it could possibly work. Really, it is quite simple, just involves a couple extra steps compared to a regular cake.
I’ve photographed every step along the way and hope you love this Picnic Party Cake recipe / tutorial. Leave me a message in the comments with any questions you may have!
How to make a Plaid Cake
Prep
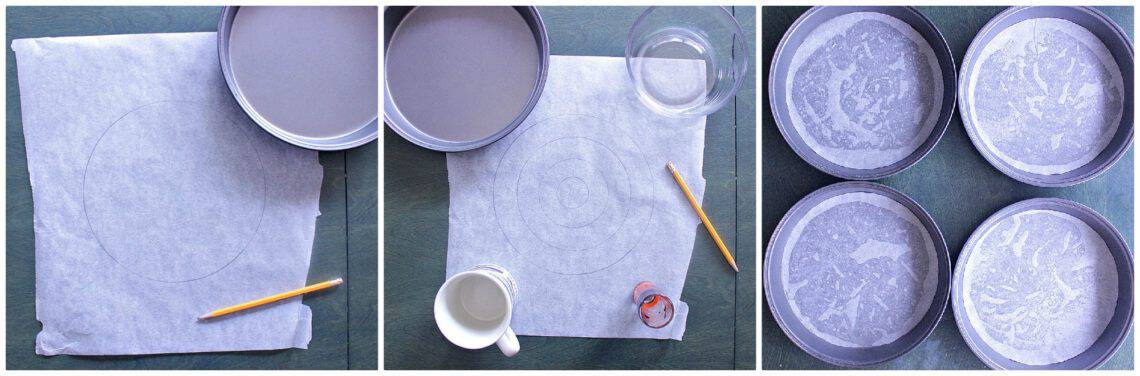
First step is to create a stencil for your cake and prep your cake pans.
Take parchment paper and trace your 9″ pan 5 times. 4 of these are to be cut out to layer the bottom of each cake pan. For the fifth, three more circles need to be drawn inside the original circle. I used a small bowl, a mug and a shot glass to trace perfect circles, but if you had a compass around, that would be even better.
Carefully cut out the four circles and save for later.
Spray 4x 9″ round cake pans with cooking oil and place the parchment circles inside. They are now ready for the cake batter.
Make the cakes
Heat oven to 350°.
Using a stand mixer with the whisk attachment whip egg whites into firm peaks. Scrape bowl and set aside.
Switch to the paddle attachment and whip butter for 3 minutes, until it becomes super white. Beat in oil and sugar until light and fluffy. Add almond and vanilla extract and mix well.
In a separate bowl combine flour, baking powder, baking soda and salt. Add half of the flour to the butter and mix until just combined. Pour in half of the buttermilk and mix until just combined. Repeat with the remaining flour and then the remaining buttermilk. Fold in the egg whites.
Remove half of the batter and divide between two of the cake pans.
Dye the remaining half with red food colouring gel until you have ultra red batter. Divide between the two remaining cake pans.
Bake cakes for 20-25 minutes or until a toothpick comes out clean. Let rest for five minutes then turn cakes out onto cooling racks and cool to room temperature.
If you aren’t building the cake that day, wrap each cake individually in plastic wrap and leave at room temperature.

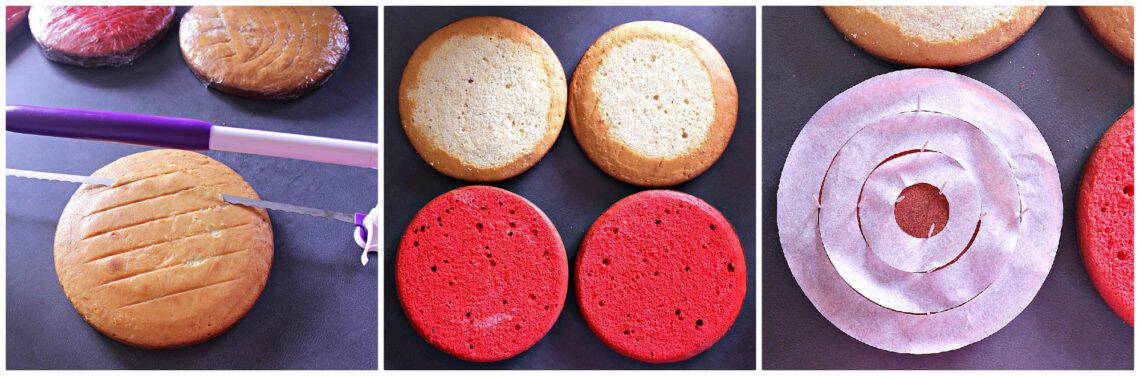
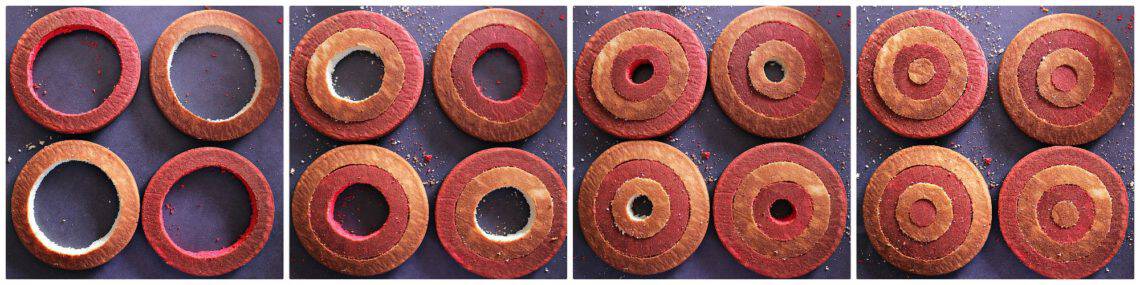
Cut the cakes
Start by slicing off the top of each cake so that each cake is the same height. A few years ago Santa put this lovely tool in my stocking that is amazing for situations like this. You can use it not only to evenly top each cake, but you can adjust and lock it so that each cake is the exact same height! Brilliant. It’s called a large folding cake leveler and is made by Wilton.
Place the cut out stencil over top of each cake, pin it with toothpicks and cut along the edge of each circle. You should make three circle cuts per cake, and produce four different sized circles.
Create the cake layers
Start by removing the outer circle from each cake. Now take the second largest circle and place it inside the largest circle of the opposite colour. Take the next sized colour and place it inside, alternating colours. Lastly place the smallest circle inside each layer, again alternating colours.
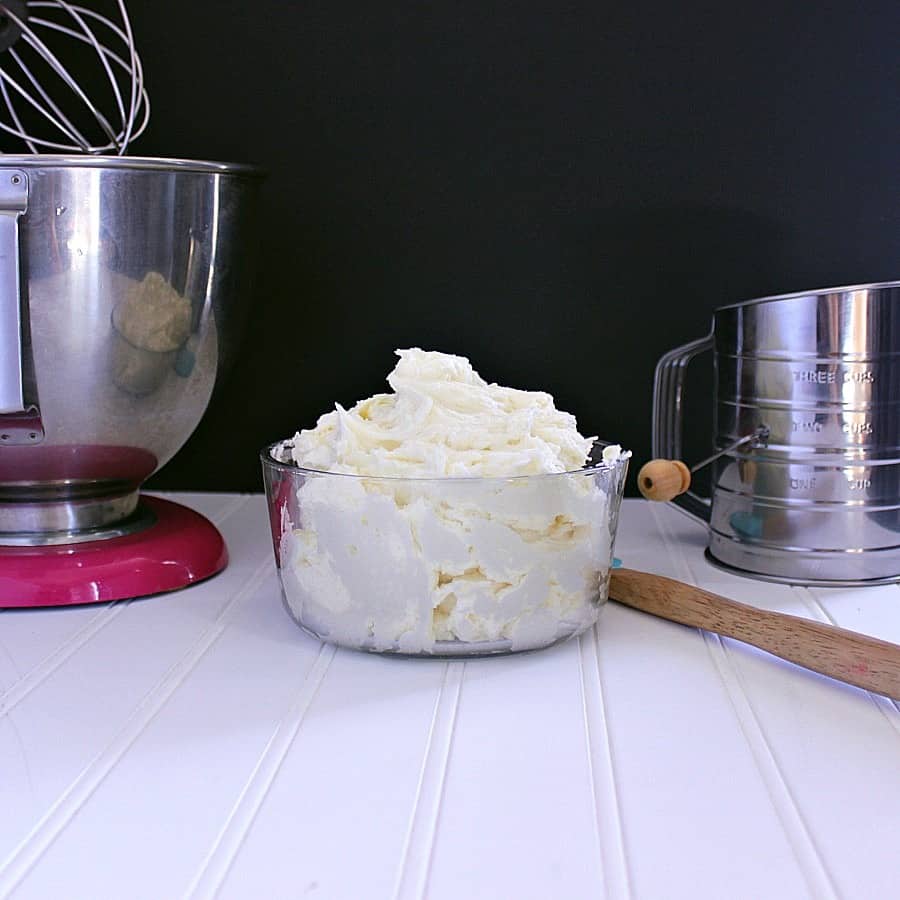
Buttercream
In a stand mixer with the whisk attachment whip butter for 3 minutes until super white. Add in sifted icing sugar, heavy cream, vanilla and salt. Mix for a few minutes until light and fluffy.
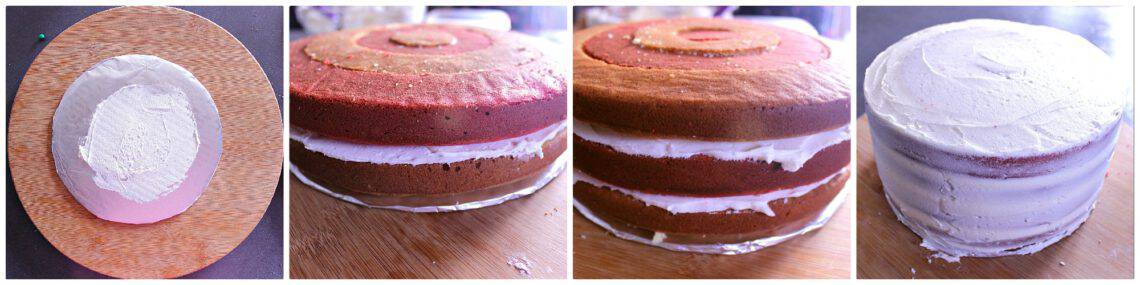
Stack the layers
Trace out 1 x 9″ circle onto a piece of cardboard. Cut out the circle and cover with tin foil. Alternately you can buy a cake board.
Put a little bit of buttercream underneath the cake board and stick it to your cake table. (I use a lazy susan as my cake table) Spread a small amount of buttercream on top of the cake board and place your first cake layer on top. Start with the layer that has white cake on the outside.
Spread a layer of buttercream on top of the first cake layer then place a cake layer with the red outside on top. Spread buttercream over top of the second layer and top with a third cake layer, the last one with the white circle on the outside.
Cover with buttercream and add the last layer of cake. This one should have a red outer circle. Do a light crumb coat with the buttercream and refrigerate for 10 minutes before the last layer of buttercream.
Finish
I love these cake scrapers for making beautiful cakes! This particular set I got comes with a few different tools to create all sorts of different edges.
For this cake I chose a smooth finish because my daughter wanted a pink picnic party cake, so I covered it with pink fondant.

Fondant
This cake is gorgeous as is, but my daughter NEEDED a pink sparkly cake this year. A picnic, pink, sparkly cake. So I covered it with pink fondant and added some sparklers for the sparkle. Do you like fondant? I use a yummy marshmallow fondant recipe when covering cakes so that it is actually edible! Recipe to come!

How to make buttermilk
Unless I’m doing a whole bunch of baking, I never have buttermilk in my house, yet use it often because I make buttermilk pancakes for my little ladies a few times a week!
To make 1 cup of buttermilk you need a measuring cup, 1 tbsp of vinegar and just under 1 cup of milk. Add the vinegar to the measuring cup and pour in milk until you have 1 cup. Give it a stir and let sit for 5 minutes until the milk curdles. You’ve just made buttermilk! Wahoo! Easy right?
Tips and Tricks
If I missed anything in this recipe / tutorial, please leave me a question in the comment section! Here are a few tips and tricks that may help you along the way.
- Make sure to separate the egg yolks from the whites very carefully. The egg whites won’t whip into firm peaks if there is the slightest hint of yolk! To avoid wasting a lot of eggs, I always crack each egg into its own bowl first before dumping the egg white in with the other egg whites, just in case I accidentally get a little bit of yolk in with the white.
- Butter can be super yellow in colour which can really mess with this white cake and white buttercream. To make it as white as possible, whip it on high for a few minutes. The longer it’s whipped, the whiter it becomes.
- Going off of the last point, make sure to use clear vanilla. The brown vanilla will dilute the bright white from the cake and buttercream.
- If you find your circles aren’t super tight, you can add buttercream in between each circle as you are building the layers. I didn’t find this necessary, the cake stuck together pretty good as it was being served, but it is an option for extra security.

Love this recipe? Try these next:
Classic Cheesecake with Strawberry Sauce
Subscribe to Mama Bear’s monthly newsletter to be kept up to date on the latest and greatest!

Super Cool Picnic Party Plaid Cake
Ingredients
Cake Layers
- 9 egg whites
- 1 cup unsalted butter softened
- 1/2 cup vegetable oil
- 2.25 cups white sugar
- 1 tbsp clear vanilla extract
- 3/4 tsp almond extract
- 2 cups buttermilk
- 5 cups flour
- 2 tbsp baking powder
- 1.5 tsp baking soda
- 3/4 tsp salt
- red food colouring gel
Buttercream
- 1.25 cups butter softened
- 5 cups icing sugar sifted
- 6 tbsp heavy cream
- 1.25 tsp clear vanilla extract
- 1/4 tsp salt
Instructions
Equipment Needed
- Parchment Paper, pencil and compass (or various cups and bowls)
- 4 x 9″ cake pans
- Spatula
- Cooling Rack
- Toothpicks
- Cake Table (or Lazy Susan)
- Carboard or Cake Board and tin foil
Directions
Prep
- Take parchment paper and trace your 9″ pan 5 times. 4 of these are to be cut out to layer the bottom of each cake pan. For the fifth, 3 more circles need to be drawn inside the original circle. I used a small bowl, a mug and a shot glass to trace perfect circles, but if you had a compass around, that would be even better.
- Carefully cut out the four circles and save for later. Spray 4x 9″ round cake pans with cooking oil and place the parchment circles inside. They are now ready for the cake batter. Check out post above for photos.
Make the cakes
- Heat oven to 350°. Using a stand mixer with the whisk attachment whip egg whites into firm peaks. Scrape bowl and set aside.
- Switch to the paddle attachment and whip butter for 3 minutes, until it becomes super white. Beat in oil and sugar until light and fluffy. Add almond and vanilla extract and mix well.
- In a separate bowl combine flour, baking powder, baking soda and salt. Add half of the flour to the butter and mix until just combined. Pour in half of the buttermilk and mix until just combined. Repeat with the remaining flour and then the remaining buttermilk. Fold in the egg whites.
- Remove half of the batter and divide between two of the cake pans. Dye the remaining half with red food colouring gel until you have the desired colour. Divide between the two remaining cake pans.
- Bake cakes for 20-25 minutes or until a toothpick comes out clean. Let rest for five minutes then turn cakes out onto cooling racks and cool to room temperature.
Cut the Cakes
- Start by slicing off the top of each cake with the cake leveler so that each cake is the same height.
- Place the cut out stencil over top of each cake, pin it with toothpicks and cut along the edge of each circle. You should make three circle cuts per cake, and produce four different sized circles.
Create the layers
- Start by removing the outer circle from each cake. Now take the second largest circle and place inside the largest circle of the opposite colour. Take the next sized colour and place it inside, alternating colours. Lastly place the smallest circle inside each layer, again alternating colours. See the photos in the post above for each step!
Make Buttercream
- In a stand mixer with the whisk attachment whip butter for 3 minutes until super white. Add in sifted icing sugar, heavy cream, vanilla and salt. Mix for a few minutes until light and fluffy.
Stack the layers
- Trace out 1 x 9″ circle onto a piece of cardboard. Cut out the circle and cover with tin foil. Alternately you can buy a cake board.
- Put a little bit of buttercream underneath the cake board and stick it to your cake table or lazy susan. Spread a small amount of buttercream on top of the cake board and place your first cake layer on top. Start with the layer that has white cake on the outside.
- Spread a layer of buttercream on top of the first cake layer then place a cake layer with the red outside on top. Spread buttercream over top of the second layer and top with a third cake layer, the last one with the white circle on the outside.
- Cover with buttercream and add the last layer of cake. This one should have a red outer circle. Do a light crumb coat with the buttercream and refrigerate for 10 minutes before the last layer of buttercream.
Finish
- Use a cake scraper / smoother to create a smooth finish or textured finish.


This cake looks spectacular! I know it under the name battenberg cake! The red and white is perfect for a picnic!
Oh Battenberg? Thank you for the proper name for it! 🙂
This is really pretty! Love your detailed photo instructions on how to get the checkboard pattern on the cake.
Thanks Courtney! It’s easy once you see how it’s done!
What a fun cake! Love those red checkers!
Thank you Kelly 🙂