Super Cool Picnic Party Plaid Cake
Impress your friends and family with this deceivingly easy Super Cool Picnic Party Cake that is perfect for birthday parties or picnic themed barbecues.
Ingredients
Cake Layers
- 9 egg whites
- 1 cup unsalted butter softened
- 1/2 cup vegetable oil
- 2.25 cups white sugar
- 1 tbsp clear vanilla extract
- 3/4 tsp almond extract
- 2 cups buttermilk
- 5 cups flour
- 2 tbsp baking powder
- 1.5 tsp baking soda
- 3/4 tsp salt
- red food colouring gel
Buttercream
- 1.25 cups butter softened
- 5 cups icing sugar sifted
- 6 tbsp heavy cream
- 1.25 tsp clear vanilla extract
- 1/4 tsp salt
Instructions
Equipment Needed
- Parchment Paper, pencil and compass (or various cups and bowls)
- 4 x 9" cake pans
- Spatula
- Cooling Rack
- Toothpicks
- Cake Table (or Lazy Susan)
- Carboard or Cake Board and tin foil
Directions
Prep
- Take parchment paper and trace your 9" pan 5 times. 4 of these are to be cut out to layer the bottom of each cake pan. For the fifth, 3 more circles need to be drawn inside the original circle. I used a small bowl, a mug and a shot glass to trace perfect circles, but if you had a compass around, that would be even better.
- Carefully cut out the four circles and save for later. Spray 4x 9" round cake pans with cooking oil and place the parchment circles inside. They are now ready for the cake batter. Check out post above for photos.
Make the cakes
- Heat oven to 350°. Using a stand mixer with the whisk attachment whip egg whites into firm peaks. Scrape bowl and set aside.
- Switch to the paddle attachment and whip butter for 3 minutes, until it becomes super white. Beat in oil and sugar until light and fluffy. Add almond and vanilla extract and mix well.
- In a separate bowl combine flour, baking powder, baking soda and salt. Add half of the flour to the butter and mix until just combined. Pour in half of the buttermilk and mix until just combined. Repeat with the remaining flour and then the remaining buttermilk. Fold in the egg whites.
- Remove half of the batter and divide between two of the cake pans. Dye the remaining half with red food colouring gel until you have the desired colour. Divide between the two remaining cake pans.
- Bake cakes for 20-25 minutes or until a toothpick comes out clean. Let rest for five minutes then turn cakes out onto cooling racks and cool to room temperature.
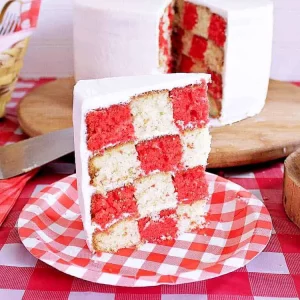
Cut the Cakes
- Start by slicing off the top of each cake with the cake leveler so that each cake is the same height.
- Place the cut out stencil over top of each cake, pin it with toothpicks and cut along the edge of each circle. You should make three circle cuts per cake, and produce four different sized circles.
Create the layers
- Start by removing the outer circle from each cake. Now take the second largest circle and place inside the largest circle of the opposite colour. Take the next sized colour and place it inside, alternating colours. Lastly place the smallest circle inside each layer, again alternating colours. See the photos in the post above for each step!
Make Buttercream
- In a stand mixer with the whisk attachment whip butter for 3 minutes until super white. Add in sifted icing sugar, heavy cream, vanilla and salt. Mix for a few minutes until light and fluffy.
Stack the layers
- Trace out 1 x 9" circle onto a piece of cardboard. Cut out the circle and cover with tin foil. Alternately you can buy a cake board.
- Put a little bit of buttercream underneath the cake board and stick it to your cake table or lazy susan. Spread a small amount of buttercream on top of the cake board and place your first cake layer on top. Start with the layer that has white cake on the outside.
- Spread a layer of buttercream on top of the first cake layer then place a cake layer with the red outside on top. Spread buttercream over top of the second layer and top with a third cake layer, the last one with the white circle on the outside.
- Cover with buttercream and add the last layer of cake. This one should have a red outer circle. Do a light crumb coat with the buttercream and refrigerate for 10 minutes before the last layer of buttercream.
Finish
- Use a cake scraper / smoother to create a smooth finish or textured finish.
Tried this recipe?Let us know how it was!